Ads

Wednesday, 23 April 2014

Showing the ID on SharePoint List item display/edit screens

Here is a tutorial on how to show items IDs on the display and edit forms.
We are able to display the list item IDs when viewing the list, but the IDs are not present when we open or edit the items.


To add IDs to the display and edit forms we need to first know their URLs
Default display form name: DispForm.aspx
  • Full URL example (http://localhost/Lists/Sales/DispForm.aspx)
Default edit form name: EditForm.aspx
  • Full URL example (http://localhost/Lists/Sales/EditForm.aspx)


(if you are using custom forms with different names you can use SP Designer to check the default form names)

To edit these forms from the browser like they were a page we can add the text ?toolpaneview=2 to the end of the URL.
This will make the page edit tools available to you.


Add a HTML Form Web Part to the page, now we can add our own custom code to the page.
This solution requires JQuery so you have 2 choices on how to reference it.
  1. If you are in an environment where you have unrestricted access to the internet you can reference JQuery through the google APIs.


<script src="http://ajax.googleapis.com/ajax/libs/jquery/1.10.2/jquery.min.js"></script>


  1. If you are in an environment where internet access is restricted you can download a copy of JQuery and upload it to a SharePoint library then reference it.
<script src="http://localhost/Shared%20Documents/jquery-1.10.2.min.js"></script>
Once you figure out which JQuery you are going to go with copy and paste the code below into the Source.


<script src="http://ajax.googleapis.com/ajax/libs/jquery/1.10.2/jquery.min.js"></script>
<script type="text/javascript">
$(function() {
// Get ID
var id = getQueryString()["ID"];
// Get the main form table
var maintable = $('table.ms-formtable');
// Now add a row to the start of the table
maintable.prepend("<tr><td class='ms-formlabel'><h3 class='ms-standardheader'>ID</h3></td>" +
"<td class='ms-formbody'>" + id + "&nbsp;</td></tr>");
})
function getQueryString() {
var assoc = new Array();
var queryString = unescape(location.search.substring(1));
var keyValues = queryString.split('&');
for (var i in keyValues) {
var key = keyValues[i].split('=');
assoc[key[0]] = key[1];
}
return assoc;
}
</script>


You should then see the ID field appear on all the forms.
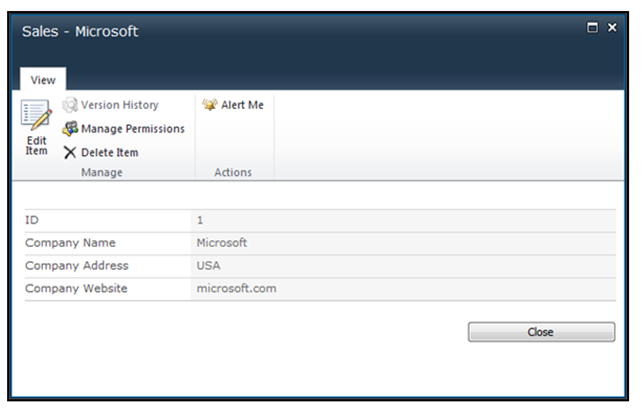

This process will need to be done on both forms (edit and display). On the edit form the ID will appear but not be editable.

SharePoint 2010 highlighting and colouring fields in a list

Scenario: You have a list of data with some fields that capture a Yes/No answer. We want to highlight Yes in green and No in red.


Example list we begin with:

Now edit the page. Site Action > Edit Page.
Now we can add a Content Editor Web Part (CEWP) to the page BELOW the list so we can add custom code:

Click into the main section of the content editor web part to make the Editing Tools ribbon appear, then click on the HTML icon and choose ‘Edit HTML Source’.
 
The script below searches for all table rows and check to see if they have a class of “ms-vb2” which is the class that list rows have. For each row we check the innerHTML for the word “Yes” and colour it green or “No” and colour it red.
Code:
<script type="text/javascript" language="javascript">
  var x = document.getElementsByTagName("TD") // find all of the TDs
  var i=0;
  for (i=0;i<x.length;i++)
  {
//find the TDs styled for lists
    if (x[i].className=="ms-vb2")
    {
                //find the data to use to determine the color
           if (x[i].innerHTML=="Yes")
            {
                // set the color
                     x[i].style.Color='green';
                }
           //find the data to use to determine the color
           if (x[i].innerHTML=="No")
                {
                // set the color
                     x[i]. style.Color='red';
                }
           } //end if
  } //end for
</script>
Copy the above script into the HTML source:
Now refresh the page or click away and come back to it. You should now see the words “Yes” in green and “No” in red.
This approach can be extended to change fonts, styles, background colours, anything that regular css can do.
Also note that this customisation is done on the list view. Meaning if you have multiple views you will have to add the web part & code to each one. But it also gives you the advantage of being able to edit each one individually.

IF statements for calculated columns in SharePoint 2010 Lists

Here are some examples of IF statements that can be used in calculated columns.
The IF statement is simply:
IF(condition, ifTrue, ifFalse)
Compare text value:
Scenario: If field1 equals Yes we want to display Approved otherwise display Rejected.
Formula:
=IF([field1]="Yes","Approved","Rejected")
2 conditions must be true using AND:
Scenario: If field1 and field2 both equal Yes then display Approved otherwise display Rejected.
Formula:
=IF(AND([field1]="Yes",[field2]="Yes"),"Approved","Rejected")
Either condition can be true:
Scenario: If field1 OR field2 equal Yes then display Approved otherwise display Rejected.
Formula:
=IF(OR([field1]="Yes",[field2]="Yes"),"Approved","Rejected")
Check if field is blank:
Scenario: If field1 is blank display Approved otherwise display Rejected.
Formula:
=IF(ISBLANK([field1]),"Approved","Rejected")
Compare number column values:
Scenario: If field1 is less than 1 Approved otherwise display Rejected.
Formula:

=IF([field1]<1,"Approved","Rejected")

Export sharepoint user profile properties to excel using C#

This is a short guide on how to export the properties from a Sharepoint 2010 user profile database into a spreadsheet using a simple C# script.

Our end result is to get this export into a format something like:


  1. Open Visual Studio
  2. Create new project - Visual C# > Consolse Application

  1. Name it UserProfileDataExtract
  2. Add the missing references below

using System;
using System.Collections.Generic;
using System.Linq;
using System.Text;
using System.Data.SqlClient;
using System.IO;
using Microsoft.SharePoint;
using Microsoft.SharePoint.Administration;
using Microsoft.Office.Server;
using Microsoft.Office.Server.UserProfiles;
namespace UserProfileDataExtract
{
    class Program
    {
        static void Main(string[] args)
        {

            Console.WriteLine("Accessing mysite.......");
 
            //This is the mysite location
            SPSite site = new SPSite("http://mysite/people");

            Console.WriteLine("Site Accessed.......");

            StringBuilder sb = new StringBuilder(); 
 
            //Creating headers in the first row
  sb.Append("Username,"); sb.Append("Firstname,"); sb.Append("Lastname,"); sb.Append("Phone,"); sb.Append("Mobile,");
            sb.Append("Email,");
            sb.Append("Manager,");
            sb.Append("JobTitle,");
            sb.Append("\r\n");
  
            Console.WriteLine("Using Site.......");
            using (site)
            {
                Console.WriteLine("Get Context and profile manager.......");
                SPServiceContext context = SPServiceContext.GetContext(site);
                UserProfileManager profileManager = new UserProfileManager(context);

                //Loop through all the user profiles in the sharepoint database
                Console.WriteLine("Starting Loop.......");
                foreach (UserProfile profile in profileManager)
                {
                   //Retrieve the profileimage values for current user
                    string strName = Convert.ToString(profile[PropertyConstants.UserName].Value);
                    string FName = Convert.ToString(profile[PropertyConstants.FirstName].Value);
                    string LName = Convert.ToString(profile[PropertyConstants.LastName].Value);
                    string Phone = Convert.ToString(profile[PropertyConstants.WorkPhone].Value);
                    string Mobile = Convert.ToString(profile[PropertyConstants.CellPhone].Value);
                    string Email = Convert.ToString(profile[PropertyConstants.WorkEmail].Value);
                    string Manager = Convert.ToString(profile[PropertyConstants.Manager].Value);
                    string JobTitle = Convert.ToString(profile[PropertyConstants.JobTitle].Value);
                    Console.WriteLine("Processing: " + strName);
sb.Append(strName + ","); sb.Append(FName + ","); sb.Append(LName + ","); sb.Append(Phone + ","); sb.Append(Mobile + ","); sb.Append(Email + ","); sb.Append(Manager + ","); sb.Append(JobTitle.Replace(",", "-") + ",");
                    sb.Append("\r\n");
               }
          Console.WriteLine("Finished profile retrieval");
          Console.WriteLine("Writing to csv file");
          //Write the long string to a csv file and save it to the desktop
          TextWriter tw = new StreamWriter(Environment.GetFolderPath(Environment.SpecialFolder.Desktop) + "\\" + "SharePointUserData.csv");
          tw.WriteLine(sb.ToString());
          tw.Close(); 
          } 
      }//End Main
    }//End class
 }

Ads