Ads

Showing posts with label PowerShell. Show all posts

Friday, 4 May 2018

Powershell to add user in Sharepoint group


Below is the PS commands to give permission to user in any SharePoint site in any SharePoint group

Here I have added my account(RR) to group “test 222 Owners” of site collection https://***/sites/test_222/
  • Replace https://***/sites/test_222/  with Site collection URL   
  • Replace test 222 Owners with group name
  • Replace RR  with User Signum.

So use above work around to resolve individual’s incident related  to access issue or add user incidents in Ericoll extranet site.

$SiteCollection = Get-SPSite “https://***/sites/test_222/
$Rootweb = $SiteCollection.RootWeb
$NewExtranetUser = New-SPUser -UserAlias "i:0#.w|ericsson\RR"
                Web  "https://***/sites/test_222/"  <Above command will ask for web value so give your site collection URL>

$SharePointGroup = Rootweb.SiteGroups["test 222 Owners"]
Set-SPUser -Identity $NewExtranetUser -Web Rootweb -Group $SharePointGroup


Thursday, 6 April 2017

PowerShell to get all site collections details like URL, Root Template, Contnet DB in CSV file

Below is the full script with all functions that can be used to retrieve site collection details like URL, Site ID, Template name, Size of site, Content DB. Follow the steps
  1. Copy all below contents in one text file 
  2. Provide the web application URL
  3. Change the extension of text file from .txt to .ps1 file. (Like - GetAllSites.ps1
  4. Execute this .ps1 file (GetAllSites.ps1) in SharePoint management shell

#Start:  Custom Variable Entry
$webAppUrl = "Your Web Application URL Here"
#End: Custom Variable Entry

if ((Get-PSSnapin -Name Microsoft.SharePoint.Powershell -ErrorAction SilentlyContinue) -eq $null )
{
    Add-PSSnapin Microsoft.SharePoint.Powershell
}
function Execute-GetAllSites
{
    $WebApplication = Get-SPWebApplication -Identity $webAppUrl
   
    if ($WebApplication -ne $null)
     {
        foreach ($SiteCollection in  $WebApplication.Sites)
        {
            Try
            {
                if ($SiteCollection -ne $null)
                {                   
                    $SiteTitle = $SiteCollection.RootWeb.Title
                    Write-Host "$($SiteTitle.Substring(0,1))"  -NoNewLine
                   
                    $RootWeb = $SiteCollection.RootWeb
                    $WebTemplate = $RootWeb.WebTemplate
                   
                    #$Size = [string]$SiteCollection.Usage.Storage/1000000
                    $SizeinMB = [System.Math]::Round((($SiteCollection.Usage.Storage)/1MB),2)
                   
                    $contentDB = $SiteCollection.ContentDatabase.Name
                   
                    Write-Excel-SiteCollections $LogFile_Excel $SiteCollection.Url $SiteCollection.ID $WebTemplate $SizeinMB $contentDB
                   
                    
                    $SiteCollection.Dispose()      
                }
            }
            Catch {}                      
        }
       
        Write-Host "----- Complete -----"
     }   
}
function Get_DateTime()
{
    $LogFileDayF = Get-Date -Format "s";
    $LogFileDateTime = $LogFileDayF.Replace(":","_")                          
    return $LogFileDateTime;
}
Function CreateExcelLogFile($LogFileName)
{   
    $logFilePath ="";
    $Date_Time = Get_DateTime   
    Try
    {       
        #$JobLogPath = $CurrentPath | Join-Path -ChildPath ("Log_AdminReport")
        $JobLogPath = $CurrentPath
    
        #Create folder path if not exists
        if(!(Test-Path $JobLogPath))
        {
           New-Item -Path $JobLogPath -ItemType directory
        }
        $JobLogPath = $JobLogPath + "\" + $LogFileName + "_" + $Date_Time + ".csv"
    }
    Catch
    {}     
    return $JobLogPath
}
function Write-Excel-SiteCollections($logFilePath,$SiteCollectionUrl,$SiteCollectionID, $WebTemplate, $Size, $contentDB)
{   
    $SiteCollectionUrl = $SiteCollectionUrl.Replace(',','%2C')
   
    if((Test-Path $logFilePath) -eq $false)
    {
        New-Item $logFilePath -type file | Out-Null
        Add-Content -Path $logFilePath -Value 'Site Collection URL,Site Collection ID,Root Web Template, Size in MB, Content DB Name'
    }

    $msg = "$($SiteCollectionUrl),$($SiteCollectionID),$($WebTemplate),$($Size),$($contentDB)"
    Add-Content -path $logFilePath -value $msg
}
function Get-ScriptDirectory
{
  $Invocation = (Get-Variable MyInvocation -Scope 1).Value
  Split-Path $Invocation.MyCommand.Path
}
#----------- Main Start point that execute ----------
$CurrentPath = Get-ScriptDirectory
$LogFile_Excel = CreateExcelLogFile 'AllSiteDetails'
Execute-GetAllSites

Result Output in CSV file


Some recommendations for you:
Powershell to create & write result output in CSV file as per need  
Powershell script to read CSV file to do any automation


Wednesday, 5 April 2017

Powershell to create & write result output in CSV file as per need

Write below functions to achieve the same

---------------- Function that will receive CSV file name and create one CSV file -----------
 Function CreateExcelLogFile($LogFileName)  #$LogFileName is the output CSV file name
{
    $Date_Time = Get_DateTime #Call a function to get DateTime to append in output csv file
    $CurrentPath = Get-ScriptDirectory #Call function to get current file path

    Try
    {       
        $JobLogPath = $CurrentPath            
        if(!(Test-Path $JobLogPath))  #Create folder path if not exists
        {
           New-Item -Path $JobLogPath -ItemType directory
        }
        $JobLogPath = $JobLogPath + "\" + $LogFileName + "_" + $Date_Time + ".csv"
    }
    Catch
    { }   
    return $JobLogPath
}
----------------------- Function to get the current execution Script path ---------------------
function Get-ScriptDirectory
{
  $Invocation = (Get-Variable MyInvocation -Scope 1).Value
  Split-Path $Invocation.MyCommand.Path
}
----------------------- Function to get date time to append in output file ---------
function Get_DateTime()
{
    $LogFileDayF = Get-Date -Format "s";
    $LogFileDateTime = $LogFileDayF.Replace(":","_")                          
    return $LogFileDateTime;
}
----------------------- Function to write in CSV file -----------
function Write-To-Excel-File($logFilePath, $Column1_Value, $Column2_SiteURL)
{   
    $Column2_SiteURL = $Column2_SiteURL.Replace(',','%2C') #Replace , with %20
    if((Test-Path $logFilePath) -eq $false)
    {
        New-Item $logFilePath -type file | Out-Null
        Add-Content -Path $logFilePath -Value 'Column1 Header,Column2 Header'
    }

    $msg = "$($Column1_Value),$($Column2_SiteURL)"
    Add-Content -path $logFilePath -value $msg
}
---------------------- Main execution point to call different functions functions -------------
#Call Create excel file function with one parameter to create CSV file 
$Excel_FilePath_WithExt = CreateExcelLogFile 'Output_CSV_FileName'

#Call write to excel function with 3 parameter to write in CSV file
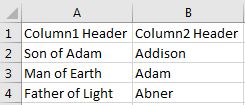
Write-To-Excel-File $Excel_FilePath_WithExt "Son of Adam" "Addison"
Write-To-Excel-File $Excel_FilePath_WithExt "Man of Earth" "Adam"
Write-To-Excel-File $Excel_FilePath_WithExt "Father of Light" "Abner"

----------------------- Out put file in CSV format --------------
Output_CSV_FileName.csv

You can also see PowerShell to read rows from excel file

Tuesday, 28 March 2017

Powershell script to read CSV file to do any automation

Lets we have one csv file with column SiteUrl. Below is the script which will read from csv file
 
 
# Power shell Read the rows from CSV file   

$CSVFile = Import-CSV -path "C:\DataHere.csv"  

foreach($row in $CSVFile)
{ 
    write-host "Read Site " + $row.SiteUrl        
    Write-host ""
    Write-host "Pausing for 200 seconds..."
    Sleep 200
} 

----------------------- or --------------

Here we are dismounting DBs by reading from CSV file as shown here


Import-CSV C:\DataHere.csv -Header Server, DatabaseName | Foreach-Object{
   if($_.DatabaseName -ne "DatabaseName")
   {       
        Dismount-SPContentDatabase $_.DatabaseName.Trim() -confirm:$false       
   }  
}


Thursday, 23 March 2017

Command to retrieve SharePoint farm/App pool account passwords

Farm account is the account which used by IIS to run Central Admin. Same way web applications and Service applications run in App Pools with their own credentials.

Along with central admin, we can also recover password of other app pools running accounts.

Lets assume we want to recover password of below app pool accounts
SharePoint Central Administration v4
SharePoint – 80
Some SharePoint Service App Pool

Here we can use IIS appcmd.exe to request the Password field from the ProcessModel section of the applicationHost.config file as like below :

cmd.exe /c $env:windir\system32\inetsrv\appcmd.exe list apppool "SharePoint Central Administration v4" /text:ProcessModel.Password

In above command we can replace "SharePoint Central Administration v4" with any app pool name to get the password.


Wednesday, 15 February 2017

Enable developer dashboard using powershell in SharePoint 2013


$content = ([Microsoft.SharePoint.Administration.SPWebService]::ContentService)
$dashboardSettings =$content.DeveloperDashboardSettings
$dashboardSettings.DisplayLevel = [Microsoft.SharePoint.Administration.SPDeveloperDashboardLevel]::On
$dashboardSettings.Update()

Tuesday, 14 February 2017

Start list workflow from powrshell

$siteURL="Site URL"
$listName="List Name"
$site=Get-Spsite $siteURL
$web=$site.RootWeb
$list=$web.Lists[$listName]
$item=$list.Items[0]
$manager=$site.WorkFlowManager
$association=$list.WorkFlowAssociations[0]
$data=$association.AssociationData
$wf=$manager.StartWorkFlow($item,$association,$data,$true)

Saturday, 31 May 2014

Delete sharepoint list item by power shell

1. Create new PowerShell (.ps1) file with below script using Notepad

$Url = "http://site-url:5000"
$ListName = "Sales 2013"
$Web = Get-SPWeb $Url
$List = $Web.lists[$ListName]

if($List -eq $null)
{    
  Write-Error "The List cannot be found";return
}

Write-Warning "Deleting all list items from $($ListName)"
$Items = $List.GetItems()
Write-Host "Total Items to be deleted : $($Items.count)"

if($Items.count -gt 0)
{
  $shell = new-object -comobject wscript.shell
  $result = $shell.popup("Total Item to be deleted : $($Items.count) `nDo   you want to continue?",0,"Alert",4+32)

if($result -eq "6")
{
foreach ($item in $Items)
{
  $itemId = $item.ID
  $List.GetItemById($itemId).Delete()
  Write-Host "Deleted list item with id $($itemId)"
}
}
}
$List.Update()
$Web.Dispose()


2. Replace values of parameters $Url and $ListName

3. Save file in server hard drive (Example: D:\PowerShell\Delete-List-Items.ps1)

4. Open "SharePoint 2010 Management Shell" with "Run as administrator"

5. Navigate to the folder where the script  file is stored
    (Example: cd D:\PowerShell)

6. Select file to be executed
    (Example: .\Delete-List-Items.ps1)

Find the Site collection Size and all details

Open SharePoint 2010 Management Shell / Windows Command Prompt as administrator

Enter below command to access "stsadm.exe" and press enter
cd "C:\Program Files\Common Files\Microsoft Shared\Web Server Extensions\14\BIN"

Type below command and press enter
STSADM.exe -o enumsites -url "<Url of the web application>"
  Command will give output where you can see site collection details like:
a.   Url
b.   Ower
c.   Content Database
d.   Storage Used MB
e.   Storage Warning MB
5.   Modify the command with text file path to get output in text file
Example:
STSADM.exe -o enumsites -url "<Url of the web application>" > c:\SiteDetails.txt

Friday, 30 May 2014

Monday, 8 July 2013

Developer Dashboard with powershell command to make it on/Off

One of the new feature in SharePoint 2010 is Developer dashboard. With help of Developer Dashboard we can get view of SharePoint enviroment and find out issues if occuring. This Provides us info about Call Stacks, Web Server, Critical Events, Database Queries, Service Calls, SP Requests, and Webpart Events. This even shows the time being taken to execute any code.

Under Database Calls this will even provide us the hyperlinks. We can click on the link and it will show us a dialog and we can see the SQL commands being Called.


Mode of developer dashboard:
On – creates everytime the output at the end of the page content
Off – switch off developer dashboard and nothing is rendered
OnDemand – creates a DeveloperDashboard icon to make dashboard output visible as needed

How to turn on Developer Dashboard?
Open Sharepoint 2010 Management Shell and type the following commands:

##Turn on
$contentService = [Microsoft.SharePoint.Administration.SPWebService]::ContentService 
$dashboard = $contentService.DeveloperDashboardSettings
$dashboard.DisplayLevel = [Microsoft.SharePoint.Administration.SPDeveloperDashboardLevel]::On
$dashboard.Update()

##Turn on Demand Mode
$contentService = [Microsoft.SharePoint.Administration.SPWebService]::ContentService
$dashboard = $contentService.DeveloperDashboardSettings
$dashboard.DisplayLevel = [Microsoft.SharePoint.Administration.SPDeveloperDashboardLevel]::OnDemand
$dashboard.Update()

##Turn Off
$contentService = [Microsoft.SharePoint.Administration.SPWebService]::ContentService
$dashboard = $contentService.DeveloperDashboardSettings
$dashboard.DisplayLevel = [Microsoft.SharePoint.Administration.SPDeveloperDashboardLevel]::Off
$dashboard.Update()

##Turn On demand using stsadm
stsadm -o setproperty -pn developer-dashboard -pv ondemand

Wednesday, 22 May 2013

reate a mysite for each SharePoint profile

So we have spent an amount of time (hopefully not too much ha) configuring the User profile service and the synchronisation which imports profiles from AD. Our filters are in place so we only have valid profiles.

For the next step we would like to automatically create all the mysites in one hit.

This may or may not be a good idea depending on your exact business requirements but if it is what you want here is a script which will iterate through the profiles and create you a my site for each user.

$site = new-object Microsoft.SharePoint.SPSite("http://mysitehost"); 
$ServiceContext = [Microsoft.SharePoint.SPServiceContext]::GetContext($site); 


$ProfileManager = new-object Microsoft.Office.Server.UserProfiles.UserProfileManager($ServiceContext); 
$AllProfiles = $ProfileManager.GetEnumerator();


foreach($profile in $AllProfiles) 
  
     $profile.CreatePersonalSite();
}


Great fun don't you reckon.

Saturday, 11 May 2013

Remove banner from Info Path by power shell command

Using Stsadm setformserviceproperty we can remove the banner from InfoPath form 2007 . 

Ex: stsadm.exe -o setformserviceproperty -pn allowbranding -pv false

Thursday, 4 April 2013

SharePoint 2010 Windows PowerShell Interview Questions

Q. What is Windows Powershell ?
Ans. Windows PowerShell is a new Windows command-line shell designed especially for system administrators. In the SharePoint administration context, Windows PowerShell is another administration tool that supersedes the existing Stsadm.exe.

Q. How is Windows Powershell different from Stsadm ?
Ans. Unlike stsadm, which accept and return text, Windows PowerShell is built on the Microsoft .NET Framework and accepts and returns .NET Framework objects. In addition to that it also gives you access to the file system on the computer so that you can access registry,digital signature certificate etc..

Q. What are cmdlet's?
Ans. Windows PowerShell introduces the concept of a cmdlet which are simple build in commands, written in a .net language like C# or VB.

Q. Can you Create PowerShell scripts for deploying components in SharePoint ?
Ans. If you are creating a webpart with VS 2010 then you can deploy it using ctrl + f5. However, to activate the webpart feature you can write a powershell script (.ps1) and execute it after dpeloyment.

Q. Where is Powershell located in sharePoint ?
Ans. On the Start menu, click All Programs -> Click Microsoft SharePoint 2010 Products -> Click SharePoint 2010 Management Shell.

Q. If you need going to install a webpart or any custom solution in SharePoint 2010 using PowerShell What permissions do you need?
Ans. In order to use Windows PowerShell for SharePoint 2010 Products, a user must be a member of the SharePoint_Shell_Access role on the configuration and content database. In addition to this, the user must also be a member of the WSS_ADMIN_WPG local group on the computer where SharePoint 2010 Products is installed. See  The Details below
Permissions for Windows PowerShell - SPShellAdmin
In order to use Windows PowerShell for SharePoint 2010 Products, a user must be a member of the SharePoint_Shell_Access role on the configuration and content database. In addition to this, the user must also be a member of the WSS_ADMIN_WPG local group on the computer where SharePoint 2010 Products is installed.

To add a user as SharePoint_Shell_Access on the SharePoint database use the below powershell cmdlet :
Add-SPShellAdmin

Please Note that to run the above cmdlet you must have 
* Membership in the securityadmin fixed server role on the SQL Server instance
* Membership in the db_owner fixed database role on all affected databases
* and local administrative permission on the local computer.


In addition to above some important things to Note:
* The user gets added to the WSS_Admin_WPG group on all Web servers when the user is added to the SharePoint_Shell_Access role.
* If the target database does not have a SharePoint_Shell_Access role, the role is automatically created.
* If you use the database parameter, the user is added to the role on the farm configuration database, the Central Administration content database, and the specified database. Using the database parameter is the preferred method because most of the administrative operations require access to the Central Administration content database. The cmdlet is something like below :
Add-SPShellAdmin -UserName Domainname\User -database {Database GUID}

Q. How to list all the commands in PowerShell ?
Ans. Get-Command * commands gets you all the Powershell commands. For more commands see 
To Open the Windows PowerShell Session :
1. On the Start menu, click All Programs.
2. Click Microsoft SharePoint 2010 Products.
3. Click SharePoint 2010 Management Shell

Note : You should have SharePoint_Shell_Access role on the configuration database and you should be a member of the WSS_ADMIN_WPG local group on the computer where SharePoint Server 2010 is installed.

Some of the Common Commands and Operations are: 

Create Web Application Variable 
$webapp = Get-SPWebApplication "http://pravahaminfol234/"

Create SharePoint Site Variable (Instance of SPSite)
$siteurl = "http://mysharepointsite/"
$Oursite=new-object Microsoft.SharePoint.SPSite($siteurl)
Here we have created a variable Oursite, which contains an instance of type SPSite. Now you can use it to Display all webs in the site collection.
$Oursite.AllWebs more // List all Webs in the Site

Create Service Application Variable
$spapp = Get-SPServiceApplication -Name "ServiceApplicationDisplayName"

Create a Webapplication: 
New -SPWebApplication -ApplicationPoolName -Name [ -Port ] [-HostHeader ] [-URL ][ -ApplicationPoolAccount ]

Delete WebApplication 
Remove-SPWebApplication –identity -URL <http://sitename/> -Confirm

Create\Delete a Site Collection: 
Create a Site collection:
Get-SPWebTemplate
$template = Get-SPWebTemplate "STS#0"
New-SPSite –Url "" –OwnerAlias "" –Template $template
Here $template is a Variable to store the type of template we want to use while creating a site collection.

Delete a Site Collection:
Remove-SPSite –Identity –GradualDelete
Here is a site Collection Url .

Back\Restore a content database
To Backup : 
Backup -SPFarm -Directory -BackupMethod -Item [-Verbose]
Backup folder - is a folder to save your backup.
BackupMethod – Can Specify between Full or Differential.

To Restore: 
Restore -SPFarm -Directory -RestoreMethod Overwrite -Item [-BackupId] [-Verbose]
If you don’t know the BackupID you can display all the backups using the below command and get the GUID of the Backup.
Get-SPBackupHistory -Directory
You can check all the Backup-Restore Operations Here

Deploy WebPart Soluiton Package
Install -SPWebPartPack -LiteralPath "PathToCABorwspFile" -Name "NameOFWebPart"
PathToCABorwspFile- is the full path to the CAB file that is being deployed.
NameOFWebPart- is the name of the Web Part that is being deployed.

Install Activate and Deactivate Feature using Windows Powershell 
Install Feature :
$MyFeatureId = $(Get -SPFeature -limit all where {$_.displayname -eq "myfeatureName"}).Id
Install -SPFeature $MyFeatureId

Activate\Enable Feature :
$singleSiteCollection = Get -SPSite -Identity http://mysinglesitecollectionurl/
Enable -SPFeature $MyFeatureId -Url $singleSiteCollection.URL

Deactivate\Disable Feature :
$singleSiteCollection = Get-SPSite -Identity http://mysinglesitecollectionurl/
Disable -SPFeature $MyFeatureId -Url $singleSiteCollection.URL

Command TO List all the PowerShell Commands 
Get-Command –PSSnapin “Get-Command –PSSnapin “Microsoft.SharePoint.PowerShell” format-table name > C:\SP2010_PowerShell_Commands.txt

Adding a content database using PowerShell in SharePoint 2010
To attach an existing content database:
Mount-SPContentDatabase "" –DatabaseServer "" –WebApplication http://webapplicationname/
is the content database to be attached.
is the name of the database server.
http://webapplicationname/ is the name of the Web application to which the content database is being attached.
To detach a content database:
Dismount-SPContentDatabase ""
Where is the name of the content database.

SharePoint 2010 Windows PowerShell Commands - II 
Some more PowerShell Commands
Site Collection Commands

Create Site Collection :
Get-SPWebTemplate
$template = Get-SPWebTemplate "STS#0"
New-SPSite -Url "" -OwnerAlias "" -Template $template

Delete Site Collection :
Remove-SPSite -Identity "URL of site Collection" -GradualDelete

Change Site collection Quotas :
Set-SPSite -Identity "SiteCollection Url" -MaxSize Quota

Add site Collection Administrators :
Set-SPSite -Identity "" -SecondaryOwnerAlias ""

Lock or unlock a site collection :
Set-SPSite -Identity "Site Collection Url" -LockState ""
is one of the following vales :
# Unlock: To unlock the site collection and make it available to users.
# NoAdditions: To prevent users from adding new content to the site collection. Updates and deletions are still allowed.
# ReadOnly: To prevent users from adding, updating, or deleting content.
# NoAccess: To prevent access to content completely. Users who attempt to access the site receive an access-denied message.
Create a site :
New-SPSite "http://sitecollection/sites/Subsite -OwnerAlias "DOMAIN\UserName" –Language 1033

Ads