Ads

Sunday, 15 November 2015

CACHING IN SHARE POINT 2010 & BEST PRACTICE

Use: Improve the speed at which Web pages load in the browser.

Types: a. The BLOB cache.
            b. The Page Output Cache. (Need to activate SharePoint Server Publishing)
            c. The Object Cache (Need to activate SharePoint Server Publishing)
BLOB cache: (Off by default)
A disk-based cache that stores files used by Web pages to load quickly and reduces the load on database server when it uses those files.
Stored directly on the hard disk drive of a front-end Web server computer.
By enabling it from Web.config of web application it will apply for all site coll of that web appl.
Configuration:
Start -> Administrative Tools -> Internet Information Services (IIS) Manager -> Navigate to sites
R-click web application site -> Explore -> Web.config -> Now find the following lines
<BlobCache location="C:\BlobCache\14" path="\.(gif|jpg|jpeg|jpe|jfif|bmp|dib|tif|tiff|themedbmp|themedcss|themedgif|themedjpg|themedpng|ico|png|wdp|hdp|css|js|asf|avi|flv|m4v|mov|mp3|mp4|mpeg|mpg|rm|rmvb|wma|wmv|ogg|ogv|oga|webm|xap)$" maxSize="10" enabled="false" />
Change the location attribute to specify a directory that has enough space to accommodate the cache size.
Change the enable to true,also can modify the file types to be cached &  maxSize  -> Save the config.

Page Output cache: (ASP.net Output Cache)
An in-memory cache that saves rendered ASPX pages.
it reduces SQL calls & workload on the WFE because pages do not need to be re-rendered.
if the pages are anonymous, then no SQL check needs to be done at all present the cached pages.
Configuration:
For catch profile setting can configure at site coll level and also from web application level
<OutputCacheProfiles useCacheProfileOverrides="false" varyByHeader="" varyByParam="*"  varyByCustom="" varyByRights="true" cacheForEditRights="false" />

Object cache: (On by default)
Stores metadata about SharePoint Server objects (like SPWeb, SPSite, SPList, etc.) on the WFEs.
If any data needs to be retrieved through these objects, the SQL Server will not be hit.
Content query WP, navigation, search query box and metadata navigation uses this feature.
Can be configured at the site collection level in UI by a site collection administrator,
Maximum cache size used by all site collections can configure from web application level
Configuration:
Open web.config of web application -> set size: <ObjectCache maxSize="100" /> -> save it

Saturday, 14 November 2015

Extend a Web application (SharePoint Server 2010)

Use:
If you want to expose the same content in a Web application to different types of users by using additional URLs or authentication methods, you can extend an existing Web application into a new zone.
It create a separate Internet Information Services (IIS) Web site for same content with diff authentication process.
Ext web app has five network zones (Default, Intranet, Internet, Custom, and Extranet).

Reference : One, Steps involved
Plan for authentication methods
Extend for web app having classic-Authentication

Friday, 13 November 2015

Difference between assemblies present in bin folder vs GAC


  • <Assembly DeploymentTarget="GlobalAssemblyCache" Location="MyCompiledClass.dll">   ->  added MyCompiledClass as assembly to GAC
  • <Assembly DeploymentTarget=" WebApplication" Location="MyCompiledClass.dll">   ->  added MyCompiledClass.dll to bin directory

GAC:
Runs with full trust
Key point is dlls in the GAC (Global Assembly Cache) have full privileges. dll's in the bin have restricted privileges.
Certain tasks such as timer jobs, workflows, service applications and event receivers only work in the GAC.
Allows for multiple versions of the dll to exist in the GAC provided versioning is used. 
Assemblies deployed to the GAC available to all of the web applications

Bin:
Deploying to the bin minimises permissios
runs with the trust level specified for the web application (standard or custom CAS policy).
Can change the level of permissions for dll's in the bin using CAS policies. (Code Access Security)
SharePoint has 2 policys/ Trust levels default: WSS_Minimal or WSS_Medium (same options as in MOSS)
Can also use ASP.NET's policies, there are about 5 of these policies in .NET and the highest level is the "Full Trust" CAS policy. ( Full, High, Medium, Low, Minimal)
Change the CAS relating to you dll's in the bin via your applications web.config.
Only code that runs in the IIS workprocess can be placed in the bin.
Bin deployment can't have multiple versions.
Assemblies deployed to the bin folder are local to the given web application
The trust levels are defined in security policy files, wss_minimaltrust.config and wss_mediumtrust.config. 
Location: local_drive:\Program Files\Common Files\Microsoft Shared\web server extensions\60\config 

Refer : one, Two 

If deployed in one web application BIN folder and want to extend/ deploy to another web application:

Upgrade SharePoint Server

CA -> Upgrade and Migration ->  Upgrade and Patch Management -> Enable Enterprise Features -> Enter Key
To enable feature in all sites:
Upgrade and Patch Management -> Enable Features on Existing Sites -> Enable all sites in this installation to use the following set of features
Powershell : Enable-SPFeature -Identity FeatureGUID -URL WebAppURL

Different between list & document library

Lists:
Can have attachments(Not indexed), Have major versions only, Do not have Check-in/Check-out features, Not have document set, No open with explorer, No folder, List content Type
SPAttachmentCollection.Add(string, byte[]) only accepting a byte[], means the attachment must fit entirely in one continuous block memory
Libraries:
Cannot have attachments (files are directly in the library), DocumentLibrary Content Type
Have both minor (draft) and major (published) versioning
Have Check-in/Check-Out, Publishing Libraries can use Page Layouts
Have Unique Document Ids out of the box, No 'Read Access' setting, 
SPFileCollection.add(string, stream): means the content can be in memory, a stream, disk or even a TCP/IP socket.

Monday, 13 April 2015

SharePoint Delegate Control with example

General delegates are also called as ambassadors, diplomats, representatives etc.
SharePoint has a couple of delegate controls like
  1. AdditionalPageHead
  2. GlobalSiteLink0
  3. GlobalSiteLink1
  4. GlobalSiteLink2
  5. PublishingConsole
  6. QuickLaunchDataSource
  7. SmallSearchInputBox
  8. TopNavigationDataSource
Apart from the above controls, we can also create our own custom delegate controls
The XML schema for delegate control is below:
<?xml version="1.0" encoding="utf-8" ?> <Elements xmlns="http://schemas.microsoft.com/sharepoint/">
 <Control Id="SmallSearchInputBox" Sequence="100" Url="/templates/mysearchcontrol.ascx"/>
</Elements>


In above, properties for the delegate control as Control Id, Sequence and URL. We identify the delegate controls based on Control Id, Sequence number. The Sequence number defines the rank of the delegate, URL describes the source location of the control.
delegate control who’s Sequence id is less has most significant role in SharePoint site and will render on the site as first preference.
 What is the use of delegate control?
Using the delegate control a developer can customize the SharePoint site controls without editing or even touching the master page.
Note: We are not customizing the existing (default) delegate control but we are creating our own control loading onto the SharePoint site.

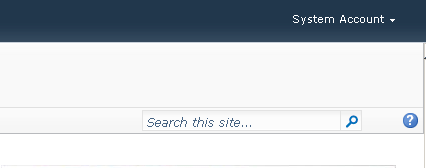
Let’s suppose assume one scenario, if we want to customize the SharePoint search box (by default SharePoint 2010 site has got input search box with one textbox and one button beside) see figure 1
Figure 1 - SharePoint 2010 Default Search Box
Figure 1 – SharePoint 2010 Default Search Box
Now I will try to customize the default search box, the requirement is to display the search box with scope drop down list, and also customizing the search button image with a arrow image button.
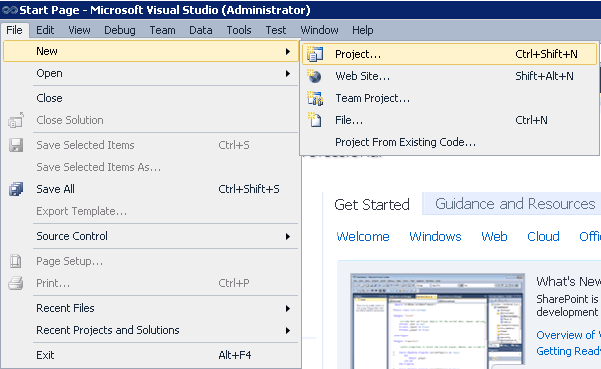
First open Visual Studio 2010 and click New > Project see figure 2
Figure 2 - Creating New Visual Studio 2010 Project
Figure 2 – Creating New Visual Studio 2010 Project
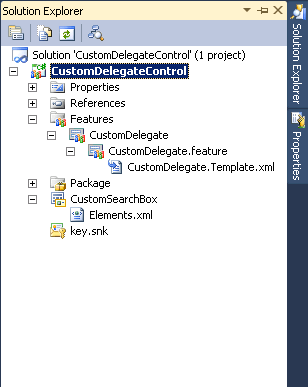
After project got created, I have deleted the not in use file (you can keep it there won’t be any problem if you don’t delete) because of maintaing clean solution I have removed user control, webpart related files see figure 3
Figure 3 - Solution Explorer File Structure
Figure 3 – Solution Explorer File Structure
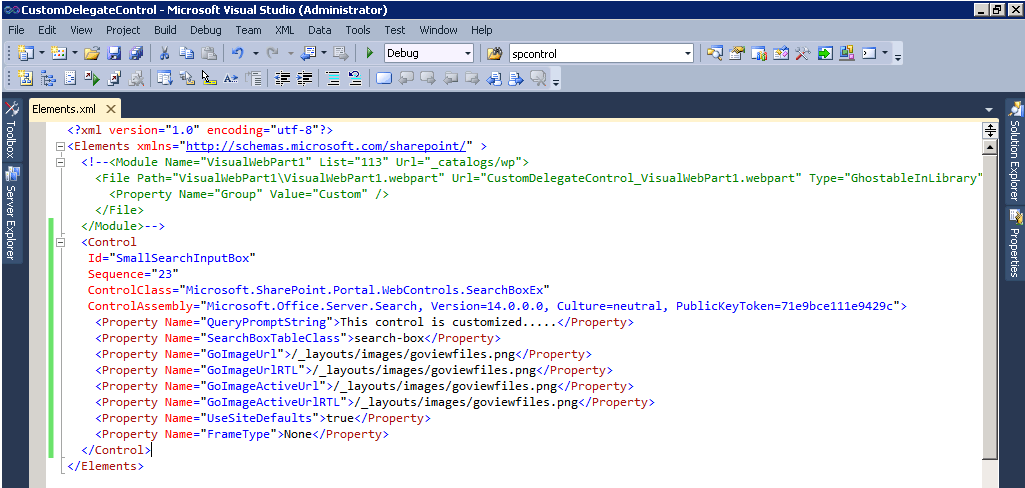
Then add the following code in Elements.xml file

<?xml version="1.0" encoding="utf-8"?>
<Elements xmlns="http://schemas.microsoft.com/sharepoint/" >
  <!--<Module Name="VisualWebPart1" List="113" Url="_catalogs/wp">
    <File Path="VisualWebPart1\VisualWebPart1.webpart" Url="CustomDelegateControl_VisualWebPart1.webpart" Type="GhostableInLibrary" >
      <Property Name="Group" Value="Custom" />
    </File>
  </Module>-->
  <Control
     Id="SmallSearchInputBox"
     Sequence="23"
     ControlClass="Microsoft.SharePoint.Portal.WebControls.SearchBoxEx"
     ControlAssembly="Microsoft.Office.Server.Search, Version=14.0.0.0, Culture=neutral, PublicKeyToken=71e9bce111e9429c">
    <Property Name="QueryPromptString">This control is customized.....</Property>
    <Property Name="SearchBoxTableClass">search-box</Property>
    <Property Name="GoImageUrl">/_layouts/images/goviewfiles.png</Property>
    <Property Name="GoImageUrlRTL">/_layouts/images/goviewfiles.png</Property>
    <Property Name="GoImageActiveUrl">/_layouts/images/goviewfiles.png</Property>
    <Property Name="GoImageActiveUrlRTL">/_layouts/images/goviewfiles.png</Property>
    <Property Name="UseSiteDefaults">true</Property>
    <Property Name="FrameType">None</Property>
  </Control>
</Elements>


In the Element.xml file I have commented the Module section see figure 4
Figure 4 - Custom Delegate Control Element.xml file
Figure 4 – Custom Delegate Control Element.xml file
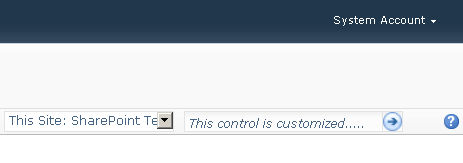
Now we are almost done, try to build, deploy and activate the feature which will result in change of SharePoint default search box with your customized control on fly without modifying the master page see figure 5
Figure 5 - SharePoint 2010 Custom Search Input Box
Figure 5 – SharePoint 2010 Custom Search Input Box

Friday, 10 April 2015

SharePoint 2013 Online App Development using NAPA Tool

 What is apps

‘Napa’ Office 365 Development Tools

For cretaing app MS has given  project templates in VS 2012 along with debugging tools.
Now MS gives new web based development tool called "Napa" Office 365 Development Tools.
Steps to create App with "Napa"
  1. Login to the Office 365
  2. Then Office 365 admin center --> developer site navigation --> Napa dev tool
  3. Napa tool download available in the home page of the developer site
  4. navigated to the Office apps store download site of the download
  5. step by step process of installing the Napa development tool to your environment.
This will be added to the trusted list of service in the browser (IE 9 or latter version)
After installation you can find NAPA inside developer site and under the site content section.


 Creating App using Napa (We will write JavaScript code to retrieve the list/library)

  1. Open the SharePoint Admin Center
  2. Under the site collection, open the developer site.
  3. Open the "Napa" Office 365 Development Tools from the developer Site Collection.
  4. Now you will be navigated to https://www.napacloudapp.com/.
  5. In the following page, you can see “What type of app do you want to build?” with App for SharePoint, Task pane App for Office, Content App for Excel and Mail App for Office project options.
  6. Enter the project name and click Create.
After creating the App using Napa, the project will auto create some folders and file as shown above.

Open the Default.aspx file under the Pages folder and add HTML tag to create a dropdown list.


Write JavaScript to retrieve the list names from the current app running context and populate the list names in the dropdown list. Open the file named App.js under the folder name Scripts.


We will write a GetListsToDisplay() which get the list/library name


And now, click on the Run Project button; appear near the status bar of the Internet Explorer.

Now your project will be packaged and installed on your SharePoint server. If this project is already running, the project uninstalls the previous version and installs the latest version.

The following screen capture will show the result for the code we have written in the JavaScript.


Ads