Ads

Thursday, 28 March 2013

CRUD Forms in Sharepoint 2010 using Business Data Connectivity Service by Designer

Follow the below steps one by one 


Step 1: Create an External Content Type
            
Step 2: Create an External List
That's it! You have created your forms, but wait, you still need to give permissions to the BDC you had created a while ago to perform the needed operations.

Step 3: Configure Business Data Connectivity Service (BDC) Permissions
Now, you need to assign permissions on the Business Data Connectivity Service you just created, and you can do that by going to Sharepoint 2010 Central Administration. Once there, go to Application Management, then Manage Service Applications.

Step 4: Try Out What You Had Created

Now go to your Team Site, then on Lists, and you should see the External List you just created and this works similar to a normal Sharepoint list where you can add, edit and delete items.

Until this point, you haven’t coded anything and it's mostly configuration, imagine doing this as a separate application. You will definitely code a lot of stuff and you won't just worry about the forms, but as well as the design and security aspects of it. You also need Visual Studio or any IDE that can develop applications like such, but with Sharepoint 2010 everything is handled for you like the security, design, content management and most importantly, the operations you needed for a table and best of all, if you or your company is stingy you can do it all for free as there is a free version for Sharepoint which is the Sharepoint Foundation 2010 and also the Sharepoint Designer. So go ahead, give it a try and definitely it will increase your productivity and you can concentrate on more gruniter tasks.

Refer:
One
Two
Three

Configure the Search Service in SharePoint 2010


After installing SharePoint 2010, the search web part does not work.
When I try searching for something in the search box, SharePoint displays the following error message
The search request was unable to connect to the Search Service.” 

This is probably due to the fact that the Search Service was never setup.
I am writing the process of setting up your SharePoint 2010 search box step-by-step.

1. We need to first start the search service application in Central Admin.
2. Go to Application Management -> Manage service application.

3. Then start a new “Search Service Application.”


4. Provide the application name, in this case “Service Search Application.”


5. Provide a search service account.


6. Configure application pools for both the “Search Admin Web Service” and the “Search Query and Site Settings Web Service.”


7. Click “OK” and wait for SharePoint to process the request. This may take several minutes.

8. A message will then appear if the search service application was successfully created.

9. OK, the search service application has been created, now we need to do some configuration work.
10. Once again, go to Application Management -> Manage service applications.
11. Select “Search Service Application,” then click the “Administrators ribbon button to configure the search service for administrators.

12. Select “SearchAdmin.” This is the service account we previously created in the search service application.

13. Now to assign the permissions.


Check Windows Services : SharePoint server Search 14 is Started


14. Before you crawler Sharepoint you must disable loopback check on farm server sharepoint2010.
Manual 
1. Click Start, click Run, type regedit, and then click OK.
2. In Registry Editor, locate and then click the following registry key:HKEY_LOCAL_MACHINE\SYSTEM\CurrentControlSet\Control\Lsa
3. Right-click Lsa, point to New, and then click DWORD Value. Type DisableLoopbackCheck, and then press ENTER.
4. Right-click DisableLoopbackCheck, and then click Modify.
5. In the Value data box, type 1, and then click OK.
6. Quit Registry Editor, and then restart your computer.
If use windows powershell Disable the loopback check on windows server 2008 / R2 
type command :
New-ItemProperty HKLM:\System\CurrentControlSet\Control\Lsa -Name “DisableLoopbackCheck” -Value “1” -PropertyType dword
After restart server , you try again for crawl on sharepoint .
and check your account have full Control and Full read in your web application


Almost done, go to Search Service Application -> Content Sources and select “Start all crawls.”

15. Once the crawl has completed, the search box is now ready to use.


Refer: Original Post, One, Two

C# code to Add/Modify the files/folders to a sharepoint Document library programmatically

using System;
using System.Data;
using System.Configuration;
using System.Web;
using System.IO;
using System.Web.Security;
using System.Web.UI;
using System.Web.UI.WebControls;
using System.Web.UI.WebControls.WebParts;
using System.Web.UI.HtmlControls;
using Microsoft.SharePoint;
using Microsoft.SharePoint.WebControls;


public partial class SharePoint : System.Web.UI.Page
{
SPWeb mySite;

// Declaring Private variable.
private string url;
private string documentLibrary;

// Extracting the data from web.config file for (URL and Document Library name).
protected void Page_Load(object sender, EventArgs e)
{
url = ConfigurationManager.AppSettings["SiteUrl"];
documentLibrary = ConfigurationManager.AppSettings["Doclibrary"];
}
///


/// FileUpload Event to upload the file on button click in sharepoint document library.
///

/// give the name of the control which occur this event
/// indicate that the current event isn’t containing any event data.
protected void UploadFile_Click(object sender, EventArgs e)
{
if (InitializeSP())
{
Stream iStream = FileUpload1.PostedFile.InputStream;
if (iStream.Length != 0)
{
string fname = GetName(true);

if (mySite.GetFolder(documentLibrary).Exists)
{
SPFolder Folder = mySite.Folders[documentLibrary];
SPFileCollection destFiles = mySite.GetFolder(documentLibrary).Files;

if (!CheckFileExists(destFiles, fname))
{
try
{
Folder.Files.Add(fname, iStream);
Result.Text = string.Format("File {0} uploaded successfully", fname);
}
catch (Exception ex)
{
Result.Text = "Error in adding the folder to the sharepoint site" + ex.ToString();
}

}
}
else
{
Result.Text = "Document Library With a name MyFiles does not exists";
}
}
else
{
Result.Text = "Cannot create Empty file";
}
mySite.AllowUnsafeUpdates = false;
}
}

///


/// FileDelete event which delete the file from sharepoint site document library.
///

/// give the name of the control which occur this event
/// for indicating that the current event isn’t containing any event data.
protected void FileDelete_Click(object sender, EventArgs e)
{
bool fileExists = false;
if (InitializeSP())
{
string fileName= GetName(true);
if (mySite.GetFolder(documentLibrary).Exists)
{
SPFolder folder = mySite.GetFolder(documentLibrary);

//Get the files from the document Library
SPFileCollection files = folder.Files;

//If you dont know the url of file and have maintained only the id of file then
//Loop through all files to get the desired file and then get url from it.
for (int noOfFiles = 0; noOfFiles < files.Count; noOfFiles++)
{
SPFile tempFile = files[noOfFiles];
//IdOfFileYouWantToDelete
if (tempFile.Name.Equals(fileName, StringComparison.InvariantCultureIgnoreCase))// IdOfFileYouWantToDelete)
{
folder.Files.Delete(tempFile.Url);
fileExists = true;
break;
}
}
Result.Text = string.Format("File {0} is deleted successfully", fileName);
if (!fileExists)
{
Result.Text = string.Format("File {0} not exists in Document Library", fileName);
}
}
mySite.AllowUnsafeUpdates = false;
}
}


///


/// FolderUpload event which upload the folder in sharepoint site document library.
/// content of folder also get loaded.
///

/// give the name of the control which occur this event
/// for indicating that the current event isn’t containing any event data.
protected void FolderUpload_Click(object sender, EventArgs e)
{

if (InitializeSP())
{
string fldName=GetName(false);

if (Directory.Exists(FolderName.Text))
{
DirectoryInfo dirinfo = new DirectoryInfo(FolderName.Text);
DirectoryTree(dirinfo);
Result.Text = string.Format("Folder {0} uploaded successfully", fldName);
}
else
{
Result.Text = string.Format("Folder {0} does not exists on the local drive", fldName);
}
}

}


///


/// Method for updating the file in sharepoint document library.
///

/// give the name of the control which occur this event
/// for indicating that the current event isn’t containing any event data.
protected void btnUpdate_Click(object sender, EventArgs e)
{
if (InitializeSP())
{
string fileName = GetName(true);
if (mySite.GetFolder(documentLibrary).Exists)
{
SPFolder folder = mySite.GetFolder(documentLibrary);
SPFileCollection filecollection = folder.Files;

if (CheckFileExists(filecollection, fileName))
{
SPFile myFile = mySite.GetFolder(documentLibrary).Files[fileName];
Stream fs = FileUpload1.PostedFile.InputStream;

if (fs.Length > 0)
{
byte[] localData = new byte[fs.Length];
fs.Read(localData, 0, localData.Length);
byte[] binFile = new byte[localData.Length + myFile.Length + 1];

(myFile.OpenBinary()).CopyTo(binFile, 0);
binFile[myFile.Length] = Convert.ToByte('\n');
localData.CopyTo(binFile, myFile.Length+1);

myFile.SaveBinary(binFile);
myFile.Update();
Result.Text = string.Format("File {0} updated successfully", fileName);
}
else
{
Result.Text = "Local file U choose is empty nothing to update";
}
}
else
{
Result.Text = string.Format("File {0} does not exists in sharepoint site", fileName);
}
}
else
{
Result.Text = string.Format("Document library {0} does not exists", documentLibrary);
}
mySite.AllowUnsafeUpdates = false;
}
}


///
/// Method for checking the file exists in the sharepoint site document library.
///

/// contains collection of files
/// name of the file to be check of
/// bool value
private bool CheckFileExists(SPFileCollection destFiles, string name)
{
bool fileExists = false;
for (int noOfFile = 0; noOfFile < destFiles.Count; noOfFile++)
{
SPFile tempFile = destFiles[noOfFile];

if (tempFile.Name.Equals(name, StringComparison.InvariantCultureIgnoreCase))
{
Result.Text = string.Format("File {0} already exists ", name);
fileExists = true;
break;
}
}
return fileExists; //return bool values depends upon the file check.
}

///
/// Intiliaze the site and give the permission to do the updates in the sites.
///

private bool InitializeSP()
{
bool isSiteExists = false;
if (url != null)
{
if (mySite == null)
{
try
{
mySite = new SPSite(url ).OpenWeb();
mySite.AllowUnsafeUpdates = true;
isSiteExists = true;
}
catch (FileNotFoundException)
{
Result.Text = string.Format(" Url {0} not found ,check the URL you have Given", url);
return isSiteExists;
}
}
else
{
Result.Text = string.Format(" Url {0} not found ,check the URL you have Given", url);
}
}
else
{
Result.Text = "Please specify the site url in config file.";
}

return isSiteExists;
}

///
/// Recursive method for checking all folders in a folder and all files in the folders .
///

/// Name of the folder

void DirectoryTree(DirectoryInfo root)
{
FileInfo[] files = null;
DirectoryInfo[] subDirs = null;


if (Directory.Exists(root.FullName.ToString()))
{
//DirectoryInfo dirinfo = new DirectoryInfo(path);
SPFolder folder = mySite.GetFolder(documentLibrary);
SPFolderCollection folderCollection = folder.SubFolders;
SPFolder AddedFolder = folderCollection.Add(root.FullName.Substring(3));

// First, process all the files directly under this folder
try
{
files = root.GetFiles("*.*");
}
catch (DirectoryNotFoundException ex)
{
Result.Text = "ERROR: Missing some Files :" + ex.ToString();
}

if (files != null)
{
for (int noOfFiles = 0; noOfFiles < files.Length; noOfFiles++)
{
FileStream fStream = File.OpenRead(root.FullName.ToString() + "\\" + files[noOfFiles].Name);
byte[] content = new byte[fStream.Length];
int c = fStream.Read(content, 0, (int)fStream.Length);
fStream.Close();
AddedFolder.Files.Add(files[noOfFiles].Name, content);
}

}

// Now find all the subdirectories under this directory.
subDirs = root.GetDirectories();

foreach (DirectoryInfo dirInfo in subDirs)
{
// Resursive call for each subdirectory.
DirectoryTree(dirInfo);
}
}
else
{
Result.Text = "Directory path not exists";
}
}

private string GetName(bool FileOrFldName)
{
if (!FileOrFldName)
{
int nameStart = FolderName.Text.LastIndexOf(@"\");
string fName = FolderName.Text.Substring(nameStart + 1);
return fName;
}
else
{
int basenamestart = FileUpload1.PostedFile.FileName.LastIndexOf(@"\");
string fName = FileUpload1.PostedFile.FileName.Substring(basenamestart + 1);
return fName;
}

}
}

Powershell to deploy multiple WSP files

Follow the steps to achieve this :
1.Open the Notepad,Write the code below,


2.Save the file with some name and having extension “.ps1”(e.g installer.ps1).
3.Next task to create Batch file.Open the Notepad again,write the following code,


4.Save As file with name “install.bat”.
5.Now its done.Hope you like this article and will save your time too.

C# code to create custom role for sharepoint sub sites in SharePoint 2010 programmatically

We will work on a scenrio like below:Person: People picker that will be used to add a user.
Country: Listbox containing the list of subsites where we will add the user and assign roles.
Administrator type: Type of custom role where we will assign to the selected user in selected susbsite (Country).
share1.gif
Code :
private void AddUserToGroup(string selectedUser, string userGroupName,string subSite)
{
SPSecurity.RunWithElevatedPrivileges(delegate
{
using (SPSite spSite = new SPSite(SPContext.Current.Site.Url))
{
using (SPWeb spWeb = spSite.AllWebs[subSite
{
try
{
spWeb.AllowUnsafeUpdates = true;
SPUser spUser = spWeb.EnsureUser(selectedUser);
spWeb.RoleDefinitions.BreakInheritance(true, true);
SPRoleDefinition role;
switch(userGroupName)
{
case "Super Administrator":
role = new SPRoleDefinition
{
Name = userGroupName,Description = userGroupName,BasePermissions = SPBasePermissions.FullMask ^
(SPBasePermissions.ManagePermissions
SPBasePermissions.ManageLists
SPBasePermissions.AddListItems
SPBasePermissions.EditListItems
SPBasePermissions.DeleteListItems
SPBasePermissions.ViewVersions
SPBasePermissions.DeleteVersions
SPBasePermissions.CreateAlerts
SPBasePermissions.CreateGroups)
};
break;
case "Regional Administrator":
role = new SPRoleDefinition
{
Name = userGroupName,Description = userGroupName,BasePermissions = SPBasePermissions.FullMask ^
(SPBasePermissions.ManagePermissions
SPBasePermissions.ManageLists
SPBasePermissions.AddListItems
SPBasePermissions.EditListItems
SPBasePermissions.DeleteListItems
SPBasePermissions.ViewVersions
SPBasePermissions.DeleteVersions
SPBasePermissions.CreateAlerts
)
};
break;
case "Marketing Administrator":
role = new SPRoleDefinition
{
Name = userGroupName,Description = userGroupName,BasePermissions = SPBasePermissions.FullMask ^
(SPBasePermissions.ManagePermissions
SPBasePermissions.ManageLists
SPBasePermissions.AddListItems
SPBasePermissions.EditListItems
SPBasePermissions.DeleteListItems
SPBasePermissions.ViewVersions
SPBasePermissions.DeleteVersions
)
};
break;
case "Country Administrator":
role = new SPRoleDefinition
{
Name = userGroupName,Description = userGroupName,BasePermissions = SPBasePermissions.FullMask ^
(SPBasePermissions.ManagePermissions
SPBasePermissions.ManageLists
SPBasePermissions.AddListItems
SPBasePermissions.EditListItems
SPBasePermissions.DeleteListItems
)
};
break;
default:
role = new SPRoleDefinition
{
Name = userGroupName,Description = userGroupName,BasePermissions = SPBasePermissions.FullMask ^
(SPBasePermissions.ManagePermissions
SPBasePermissions.ManageLists
SPBasePermissions.AddListItems
};
break;
}
spWeb.RoleDefinitions.Add(role);
spWeb.Update();
spWeb.RoleDefinitions.Cast<SPRoleDefinition>().First(def => def.Name == userGroupName);
SPRoleDefinition newrole = spWeb.RoleDefinitions[userGroupName];
SPRoleAssignment roleAssignment;
roleAssignment = new SPRoleAssignment(spUser.LoginName, spUser.Email, spUser.Name, "Notes about user");
roleAssignment.RoleDefinitionBindings.Add(newrole);
spWeb.RoleAssignments.Add(roleAssignment);
spWeb.Update();
lblError.Text = selectedUser + " is added to the " + userGroupName + "in subsite " + spWeb.Title;
}
catch (Exception ex)
{
lblError.Text = ex.Message;
}
finally
{
spWeb.AllowUnsafeUpdates = false;
}
}
}
});
}
Final output you can check from the site. It will look like below:
share2.gif

Custom Sandbox Application Page in SharePoint2010

The following are the steps to create a custom page in sandbox solution.
1. Create a project
Create a new empty SharePoint 2010 project using Visual Studio 2010 and deploy it as a Sandboxed solution.
2. Add a Web Part item
Then add a new Web Part item to your project. Remove the Web Parts Control Description file (.web part) and the Elements.xml file (This step is optional you can use if you do not want to add the Web Part to the Web Part gallery, then Web Part will only be used by our Sandboxed Application Page). Then build your control logic in the Sandboxed Web Part.
3. Add new Item and select Module
SandBox1.gif
SandBox2.gif
In the Web Part item add a new Module item. Rename the Sample.txt file to SBPage.aspx or similar; just make sure the extension is .aspx. Your Solution Explorer should then look like the image to the right.
Edit the URL and location in the elements.xml file if you want to deploy it in a document library or any other location. If you have named your items as shown above your page will end up at http://site/SBPages/SBPage.aspx.
4.Edit the ASPX page
Open up the SBPage.aspx and build a standard Web Part Page. Add the code shown below (you can modify based on your requirements):
<!DOCTYPE html PUBLIC "-//W3C//DTD XHTML 1.0 Strict//EN" "http://www.w3.org/TR/xhtml1/DTD/xhtml1-strict.dtd">
<%@ Page Language="C#"%>
<%@ Register Tagprefix="SharePointWebControls" Namespace="Microsoft.SharePoint.WebControls" Assembly="Microsoft.SharePoint, Version=14.0.0.0, Culture=neutral, PublicKeyToken=71e9bce111e9429c" %> <%@ Register Tagprefix="WebPartPages" Namespace="Microsoft.SharePoint.WebPartPages" Assembly="Microsoft.SharePoint, Version=14.0.0.0, Culture=neutral, PublicKeyToken=71e9bce111e9429c" %> <%@ Register Tagprefix="PublishingWebControls" Namespace="Microsoft.SharePoint.Publishing.WebControls" Assembly="Microsoft.SharePoint.Publishing, Version=14.0.0.0, Culture=neutral, PublicKeyToken=71e9bce111e9429c" %> <%@ Register Tagprefix="PublishingNavigation" Namespace="Microsoft.SharePoint.Publishing.Navigation" Assembly="Microsoft.SharePoint.Publishing, Version=14.0.0.0, Culture=neutral, PublicKeyToken=71e9bce111e9429c" %>|
<html dir="ltr" xmlns="http://www.w3.org/1999/xhtml">
<head id="Head1" runat="server">
<title>Sandbox Page</title>
</head>
<body onload="loadPage()">
<form id="form1" runat="server">
<div id="result">
hi..</div>
</form>
</body>
</html>
You can use any kind of HTML in here. You cannot however use code-behind or inline server-side code.
5. Add the Web Part
In the body section the Web Part will be added. This is done by using the SPUserCodeWebPart, which is a wrapper for Web Parts that lives in the Sandbox. In my case it will look like this:
<WebPartPages:SPUserCodeWebPart
runat="server"
Description="Admin"
Title="Link Web Part Page"
AssemblyFullName="$SharePoint.Project.AssemblyFullName$"
SolutionId="01d2e3c6-686b-45d6-aaea-185c7d373c0b"
ID="adminwp"
TypeFullName="Ravishankar.LinkWebPart.LinkWebPartControl.LinkWebPartControl" >
</WebPartPages:SPUserCodeWebPart>
Here we need to edit two things. First the TypeFullName must be the full name of your Web Part, just check the .cs file of your Web Part if you don't know how to get it. Secondly we need to set the SolutionId attribute to the solution id value of our solution. You can get solutionId id by opening up the Package Editor and select Manifest. Then check the Solution element for the SolutionId attribute and just copy it.
SandBox3.gif
The AssemblyFullName attribute contains a Visual Studio replaceable parameter which inserts the full name of your assembly.
6. Deploy.I add a link to the page and using in modal-popup. It will look like belowSandBox4.gif
I have not given an example with the custom page but you can use the below code for SBPage.aspx.
<%@ Page language="C#" Inherits="Microsoft.SharePoint.Publishing.PublishingLayoutPage,Microsoft.SharePoint.Publishing,Version=14.0.0.0,
Culture=neutral,PublicKeyToken=71e9bce111e9429c" %>
<%@ Register Tagprefix="SharePointWebControls" Namespace="Microsoft.SharePoint.WebControls" Assembly="Microsoft.SharePoint, Version=14.0.0.0, Culture=neutral, PublicKeyToken=71e9bce111e9429c" %> <%@ Register Tagprefix="WebPartPages" Namespace="Microsoft.SharePoint.WebPartPages" Assembly="Microsoft.SharePoint, Version=14.0.0.0, Culture=neutral, PublicKeyToken=71e9bce111e9429c" %> <%@ Register Tagprefix="PublishingWebControls" Namespace="Microsoft.SharePoint.Publishing.WebControls" Assembly="Microsoft.SharePoint.Publishing, Version=14.0.0.0, Culture=neutral, PublicKeyToken=71e9bce111e9429c" %> <%@ Register Tagprefix="PublishingNavigation" Namespace="Microsoft.SharePoint.Publishing.Navigation" Assembly="Microsoft.SharePoint.Publishing, Version=14.0.0.0, Culture=neutral, PublicKeyToken=71e9bce111e9429c" %>
<asp:Content ContentPlaceHolderId="PlaceHolderPageTitle" runat="server">
Sandbox Page </asp:Content>
<asp:Content ContentPlaceHolderId="PlaceHolderPageTitleInTitleArea" runat="server">
Sandbox Page </asp:Content>
<asp:Content ContentPlaceHolderId="PlaceHolderAdditionalPageHead" runat="server">
<style type="text/css">
body #s4-leftpanel {
display:none;
}
.s4-ca {
margin-left:0px;
}
</style>
</asp:Content>
<asp:Content ContentPlaceHolderId="PlaceHolderLeftNavBar" runat="server"></asp:Content>
<asp:Content ContentPlaceHolderId="PlaceHolderMain" runat="server">
<WebPartPages:SPUserCodeWebPart
runat="server"
Description="Sandbox Page"
Title=" Sandbox Page "
AssemblyFullName="$SharePoint.Project.AssemblyFullName$"
SolutionId="01d2e3c6-686b-45d6-aaea-185c7d373c0b"
ID="adminwp"
TypeFullName="Ravishankar.LinkWebPart.LinkWebPartControl.LinkWebPartControl" >
</WebPartPages:SPUserCodeWebPart></asp:Content>

C# to create custom sharepoint group through feature in SharePoint2010

Through this article I am demonstrating how to create groups once you activate the feature.
Below are the steps:
Step 1: Create a new sharepoint solution using VS2010.Set you feature scope as "Web".
Step 2: Right Click on feature,Add FeatureEventreciever.cs.
Step 3: Add the below code in FeatureEventreciever.cs class

For Creating group:
/// <summary>
/// Create group
/// </summary>
public static void CreateSubSiteGroup(SPWeb web, string groupName, string PermissionLevel, string groupDescription)
        {
            SPUserCollection users = web.AllUsers;
            SPUser owner = web.SiteAdministrators[0];
            SPMember member = web.SiteAdministrators[0];
            SPGroupCollection groups = web.SiteGroups;
            groups.Add(groupName, member, owner, groupDescription);
            SPGroup newSPGroup = groups[groupName];
            SPRoleDefinition role = web.RoleDefinitions[PermissionLevel];
            SPRoleAssignment roleAssignment = new SPRoleAssignment(newSPGroup);
            roleAssignment.RoleDefinitionBindings.Add(role);
            web.RoleAssignments.Add(roleAssignment);
            web.Update();
        }
For Deleting Group:
/// <summary>
/// Delete group for subsite
/// </summary>
public static void DeleteSubSiteGroup(SPWeb web, string groupName)
        {
            SPGroupCollection groups = web.SiteGroups;
            groups.Remove(groupName);
            web.Update();
        }
Step 4: Add the below code
string groupName = "Custom Group";
/// <summary>
/// Method to Attach Event receiver on feature activation.
/// </summary>
/// <param name="properties">SPFeatureReceiverProperties Properties</param>
///
public static void FeatureActivated(SPFeatureReceiverProperties properties)
        {
string groupDescription = "My Custom Group";
try
            {
using (SPWeb web = properties.Feature.Parent as SPWeb)
                {
                    CreateSubSiteGroup(web, groupName, premissionLevel, groupDescription);
                }
            }
catch (Exception ex)
            {
                ex.Message;
            }
        }
/// <summary>
/// Method to Remove Event receiver on feature deactivation.
/// </summary>
/// <param name="properties">SPFeatureReceiverProperties Properties</param>
public static void FeatureDeactivating(SPFeatureReceiverProperties properties)
        {
try
            {
using (SPWeb web = properties.Feature.Parent as SPWeb)
                {
                    DeleteSubSiteGroup(web, groupName);
                }
            }
catch (Exception ex)
            {
                ex.Message;
            }
        }
Step 5: Now we can deploy this in your server.

Sharepoint 2010 Query String shortcuts

Sometimes, during SharePoint administration, the Edit Page button won't appear. In this case is possible to insert, directly in the URLs, the parameters listed below:
 

Edit Mode -> Mode=Edit
View Mode -> Mode=View
Personal Mode -> PageView=Personal
Shared Mode -> PageView=Shared
Add Web Parts/Browse -> ToolPaneView=2
Add Web Parts/Search -> ToolPaneView=3 


 For example:
http://mysite/default.aspx?mode=edit&PageView=Shared
http://mysite/default.aspx?ToolPaneView=2&PageView=Personal

Also, to go on Site Settings insert in the URLs 
_layouts/settings.aspx http://mysite/_layouts/settings.aspx
http://mysite/subsite/_layouts/settings.aspx

Changing SharePoint Central Administration port

SharePoint 2007 chooses a random port for Central Administration Site.

With stsadm command is possible to change Central Administration port number on MOSS 2007/WSS 3.0.

To change port, go to:  
C:\Program Files\Common Files\Microsoft Shared\web server extensions\12\BIN 

Enter command: stsadm -o setadminport -port <<port_number>>

After a bit of time you will receive on command prompt:
Operation completed successfully.

create and configure Business Connectivity Services on SharePoint 2010

Requirements

AD user and group
First step is creation of a Service Account on AD which it will be used as Impersonated User (i.e. the broker that will connect to LOB System on behalf of the group of people that should have access to data but doesn’t access to the database).
image
Second step is the creation of Security Group. The Members will be all people that should have access to LOB System.
image
SQL user login
Grant access to BCSUser account on database that will be used to get data.
image

Setup Environment

Creation of Target Application ID
Connect to Sharepoint Central Administration and go to Application Management than Manage Service Application.
image
image
Click Secure Store Service
image
Click on New to create a target Application ID and write target Application ID, Display Name and select Target Application Type to Group.
image
Press next.
image
By default the fields represent how will collect the credential of the Impersonated User, in my case Windows Account. press next to go to last step where Sharepoint wants the list of users that can manage Target Application settings and the list of users (or group) that will be mapped to the credential defined foe the Target Application. In may case I use the Sharepoint Service Account as Target Application Administrator and the Secure Group previously created sps.securestorebcsuser
image
Now I have create a new Secure Store Service. The process is not complete. It is need to set credential to set the mapping for Impersonated Users.
image
In BCS Windows User Name insert the account previously created on AD.
image

External Content Type
Now we need to create external content type.
Open Sharepoint 2010 Designer (note that is strongly reccomended that you use designer on a machine in the same domain of Sharepoint 2010 Server) and click on External Content Type, than populate the fields Name and Display Name. Afterwords click on external system to define our connectivity.
image
Add a connection and select SQL Server as data Source Type
image
Define SQl Server Connection properties
image
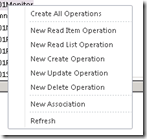
When connection is validated, you are able to connect to LOB System, expand it and select table o view that you want map, than right click and select type of operation (in my case All Operation)
image
After the wizard, to define operation properties, the validation is complete, click save button to save information about External Content Type to the BDC Metadata Store.
image
Now is necessary to set store permission to have permission to use External Content Type created.
Connect to Sharepoint Central Administration and go to Application Management than Manage Service Application and click to Business Data Connectivity Service.
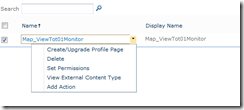
Select External Content Type Map_ViewTot01Monitor, click the custom action and select set permission.
image
After this operation you can consume BCS using External List, Chart Web Part or…

Wednesday, 27 March 2013

C# to create a Sandbox Solution WebPart for SharePoint Online

SharePoint Online development options http://msdn.microsoft.com/

1. Open Microsoft Visual Studio 2010--> New Project --> Create a empty sharePoint Project-->
 Choose trust level as a Sandbox solution
5.  Now click on Solution Explorer
6. Add new item --> Add new WebPart
8. Write simple code for class

using System;
using System.ComponentModel;
using System.Web;
using System.Web.UI;
using System.Web.UI.WebControls;
using System.Web.UI.WebControls.WebParts;
using Microsoft.SharePoint;
using Microsoft.SharePoint.WebControls;

namespace GodBlessUsWebPart.GodBlessUsWebPart
{
    [ToolboxItemAttribute(false)]
    public class GodBlessUsWebPart : WebPart
    {
        protected override void CreateChildControls()
        {
            Table tb = new Table();
            this.Controls.Add(tb);
            TableRow tbRow = new TableRow();
            tb.Rows.Add(tbRow);
            TableCell tbCell = new TableCell();
            tbRow.Cells.Add(tbCell);
            Label lbHello = new Label();
            tbCell.Controls.Add(lbHello);
            lbHello.Text = "Hello there, God bless us! Chào bạn, Thiên Chúa chúc phúc cho bạn! Bonjour à tous, Dieu nous bénisse!";
        }
    }
}

9. Rebuild project
10. Package project
11. Get GodBlessUsWebPart.wsp from debug folder of solution folder structure
12. Now go to Your Site --> Click on Site Setting --> Click Solutions under galleries
14. Click on Browse
15. Click back on Solutions
16. Click on Upload Solution
17. Click on Browse...
18. Choose  GodBlessUsWebPart.wsp to upload
19. Click OK to Upload
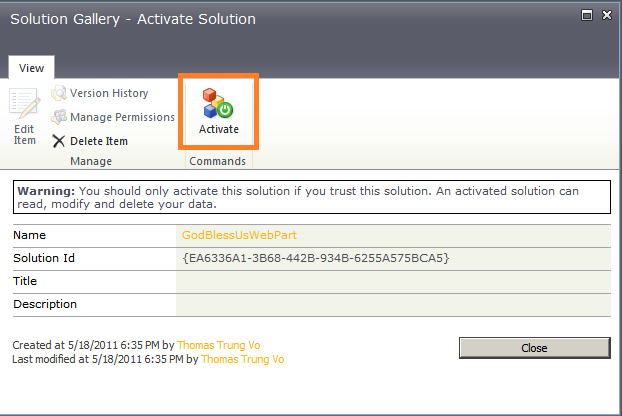
20. Click on Activate to active solution GodBlessUsWebPart
21. GodBlessUsWebPart solution already to use
22. Edit a page
23. Click Insert
24. Click on More Web Parts
25. Click on GodBlessUsWebPart then click Add
26. Exceeded daily resource usage quota
27. We must wait until the resource usage quota available for the site collection or can be add the webPart to another site collection to use (Chúng ta phải đợi cho đến khi có hạn mức sử dụng mới với site collection này hay có thể add GodBlessWebPart solution này vào một site collection khác để sử dụng)

28. The GodBlessUsWebPart look like
Dowload Solution file: GodBlessUsWebPart.wsp
Download source cod: GodBlessUsWebPart.zip

Sandboxed solution development in SharePoint Online http://msdn.microsoft.com/
SharePoint client object model architecture  http://msdn.microsoft.com/

Ads